OneSpace Connect
Getting Started
The information contained here provides a quick introduction to the OneSpace Connect App. Reading this will make using the app simpler.
Introduction
OneSpace Connect may be used to:
- Enroll your phone on your estate site.
- Capture your basic details which will be stored in the OneSpace residents’ database.
- Create a Phone Access Device that will allow you to use your phone’s Bluetooth to allow access into controlled areas.
- Create a list of your frequent visitors who you may invite using the app.
- Invite your visitors so that when they arrive, they are expected and enjoy a seamless entry into your estate.
- Keep your details up to date so that estate management has an up-to-date database and can ensure your security by making sure that all your Access Devices are verified periodically.
As the primary user, you may also:
- Create other Access Devices such as the Bluetooth Wearable Access Device, Access Tag, Vehicle and others to allow your family and employees to gain access to a OneSpace site in a controlled and secure way.
- Authorize other users' apps and access devices
Enroll Your App
Before you can do anything, you must install the OneSpace Connect App and enroll it with the OneSpace Cloud system.
Follow these steps to enroll your phone:
- Download OneSpace Connect from the Google Play Store or the Apple App Store. The app can be found under OneSpace and is called OneSpace Connect.
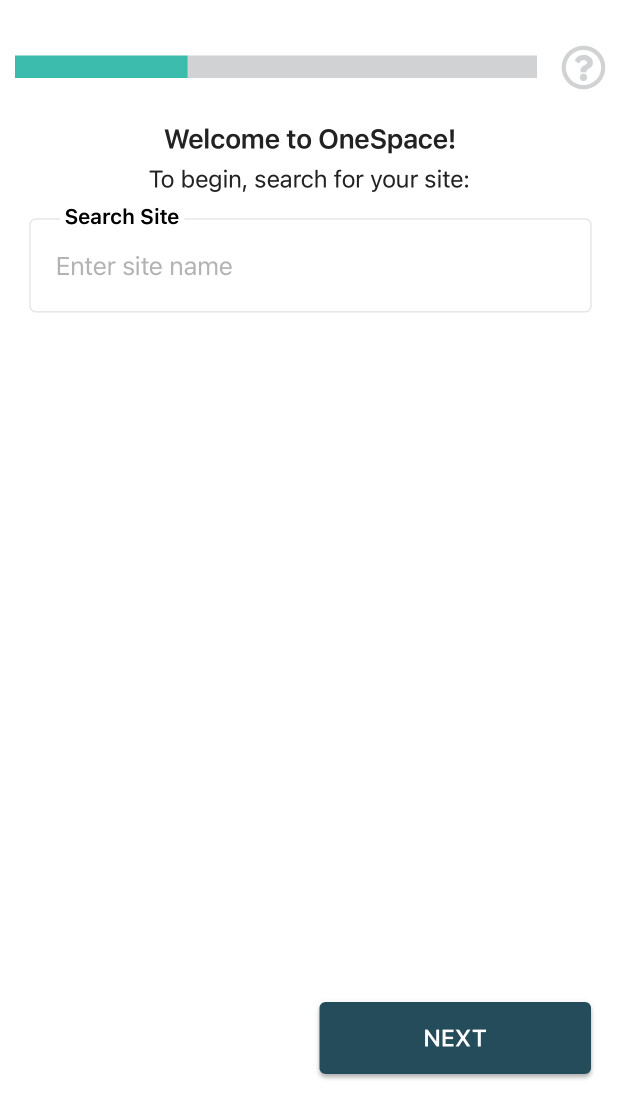
- After installing the app, you will be asked to search for your estate. It allows the app to identify the OneSpace estate you wish to enroll on.
- The app will assist you in identifying your Site and Unit.
- Type in the name of your estate. The app will automatically display potential matches. When you see the name of your estate, tap on it, and then tap Submit.
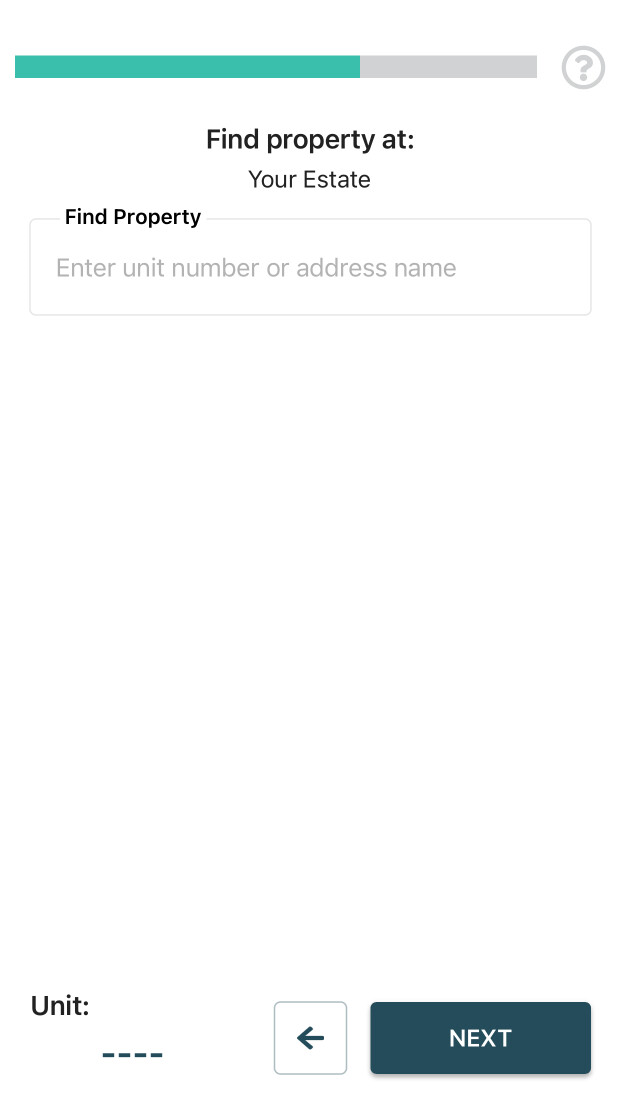
- You will now have to identify your unit. You can enter the address of the unit, or if you know your unit number, you can enter it directly.
- The first device enrolled in a unit will become the primary (main) device for the unit. A primary device should ideally belong to the person that will assume the responsibility for managing access devices for the unit. All non-phone devices may only be enrolled by the primary phone. Additional phones may be enrolled by each phone user. Select continue.
- You will then be requested to enter your details:
- Type of Resident (Owner Resident, Tenant, Employee, etc.): This field will define how often the phone must be verified. In addition, it will define when the phone may be used to gain access to the Estate.
- Name: Enter your first name and last name separated by a space.
- Phone Numbers: Enter your mobile phone number, and optionally your home number.
- ID Number: Enter your ID number.
- Email Address: Enter your email address. If you do not have an email address, enter firstnamelastname@isp.net where first name is you first name and last name is your surname. Remember this as you will use this as your login username.
- After you have entered the details, you can submit them. The app will then send the enrollment request to the person responsible for authorizing the enrolment. To ensure your security, the OneSpace system has some checks and balances built in to ensure that only valid residents can enroll. Each enrolment request is vetted by the person designated by estate management team. Close the app. You can open the app periodically to see if the enrolment has been completed, however you will receive a notification when this has been done.
- When the enrolment is accepted, you will receive a notification confirming this, or if there were some issues, you will receive a message that outlines the reason for the enrolment being rejected. After the enrolment has been authorized the app will request you to log in. The username is the email address you entered during the enrolment and the PIN is a default 1234. To ensure security, the app will require you to change your PIN from the default. Remember your PIN, as this will be used to log in.
- You can now start using the app to invite visitors, or you can add the phone as an Access Device, allowing you to use it to gain entry to the estate.
One-Time PIN (OTP)
When enrolling, you will have to enter an OTP.
An OTP is a single-use password that is sent you via SMS (or email if chosen during Replace Device), which you will need to enter into the app to proceed. This is to verify that the person enrolling has entered a number they have access to.
Access Control
Managing your access devices
Bluetooth Access
How it works
With the OneSpace App, you gain the ability to pass through gates, booms and other control points with absolute ease.
If your estate has installed Bluetooth Access, read on, else you may skip this section.
At the entrance to an estate there may be one or more entry lanes and similarly one or more exit lanes. At each lane a OneSpace Bluetooth Gateway is installed. Each gateway has a unique name, like “Entrance 1”. In addition, each Gateway has a “Lock” value.
When the OneSpace App detects gateways in range, it will display the four closest gateways arranged in the order how far they are from the phone. Each phone is also allocated a “Key” value. This key is used to determine which gateways the phone can “Unlock”. Invariably, the closest gateway will be the one that is in the entry lane where the phone finds itself.
The user can then open the boom by either tapping the button on the app, or by shaking the phone. Tapping a button allows one to open a specific boom, whilst shaking the phone will cause the nearest boom to open.
Using the Lock and Key principle, it is possible to restrict the access that a particular user has. In OneSpace, Keys are given group names, so that it is simple to give users access based on where they need to get to.
Adding a Phone Access Device
Once you have enrolled your app, you can add an Access Device that will work on the basis as described above. To do this, follow these steps:
- Go to the menu and Select Access Control
- Tap the plus sign at the bottom right of the page.
- You may be prompted to identify yourself using the phone's authentication (Password/PIN/Fingerprint).
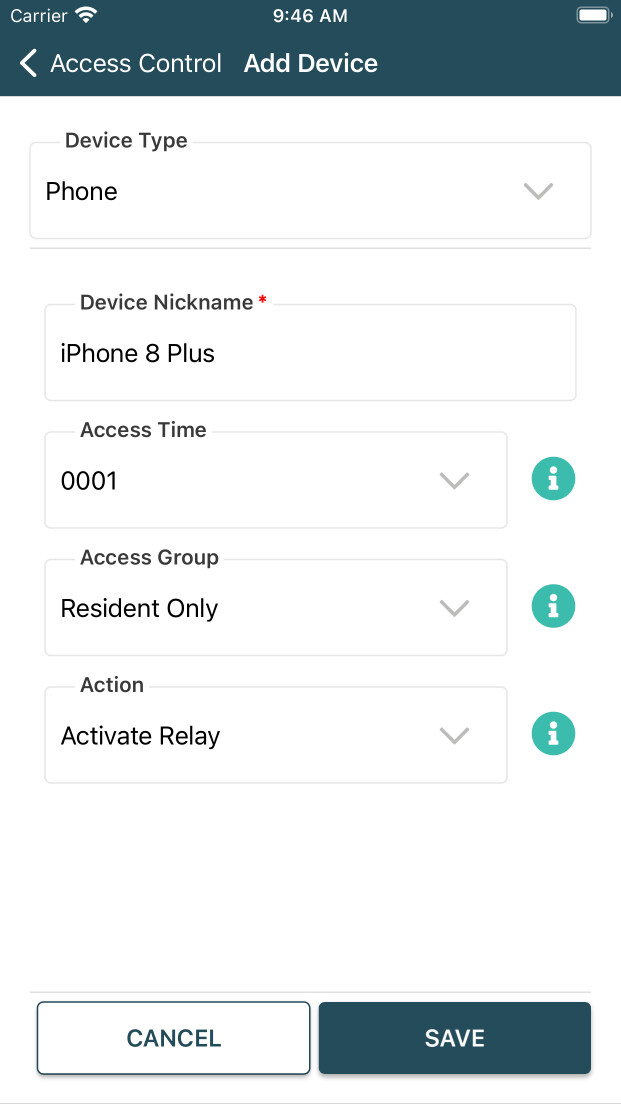
- For Device Type, Select 'Phone'.
- Enter a friendly name for the Access device like “My Phone” or leave it as the default name.
- Select the Access Time from the choice menu. This identifies your user type. See the Help for a List of Holder Classes. This feature allows you to restrict the use of an Access Device to certain hours of the day only. The person responsible for authorizing enrolments of Access Devices, may override your choice based on the type of Class selected. For instance, employees who do not live inside the estate may be restricted to normal working hours only.
- Select the Action that must be performed when the app activates the gateway. Under most circumstances, the first action should be selected. Future enhancements may require you to select a different action. If these are available, the details will be listed in Help.
- Tap Save. The Access Device enrolment request will be sent to the estate Authorizer. Once the request has been accepted or rejected, your phone will receive a notification informing you.
- Once authorized, your phone may be used to perform the selected action.
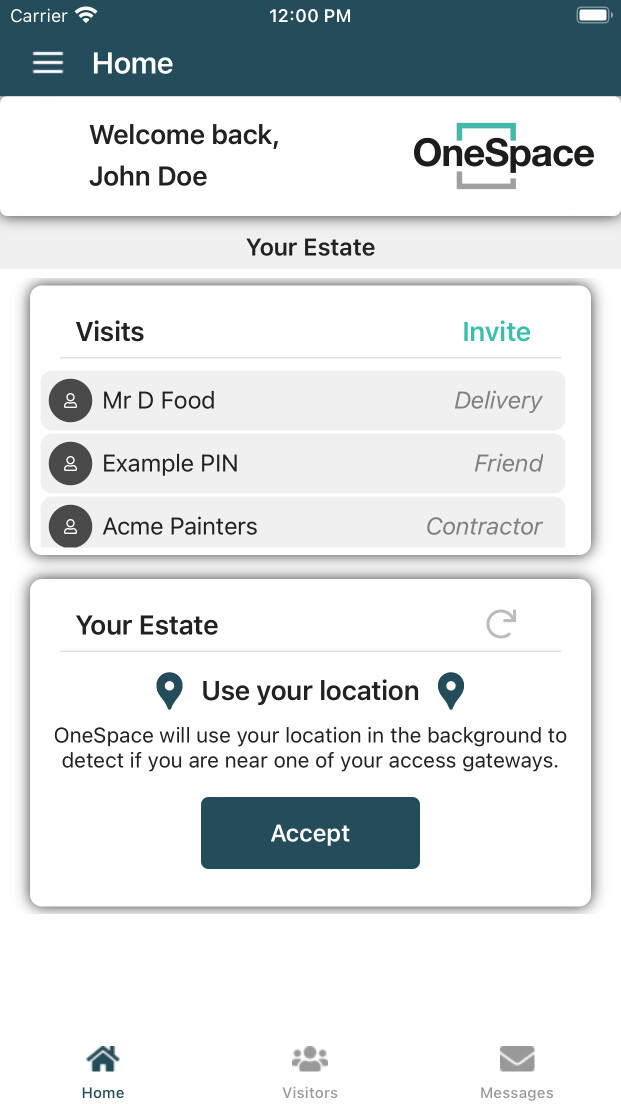
- The first time that the phone access device is started, you may be asked to allow location access. This is required to perform the actions through the app.
Enrolling Tags and Other Devices
This can only be performed by a Primary user.
Many estates may have several methods of access control. One of these are by means of Tags. A tag is a device that when presented to the installed reader at the estate entrance, will open the gate.
When enrolling a Tag, you will require a means of determining the serial number of the Tag. You may request your site administrator to assist you in finding the Tag serial number. In many cases, the serial number will be printed on the tag itself.
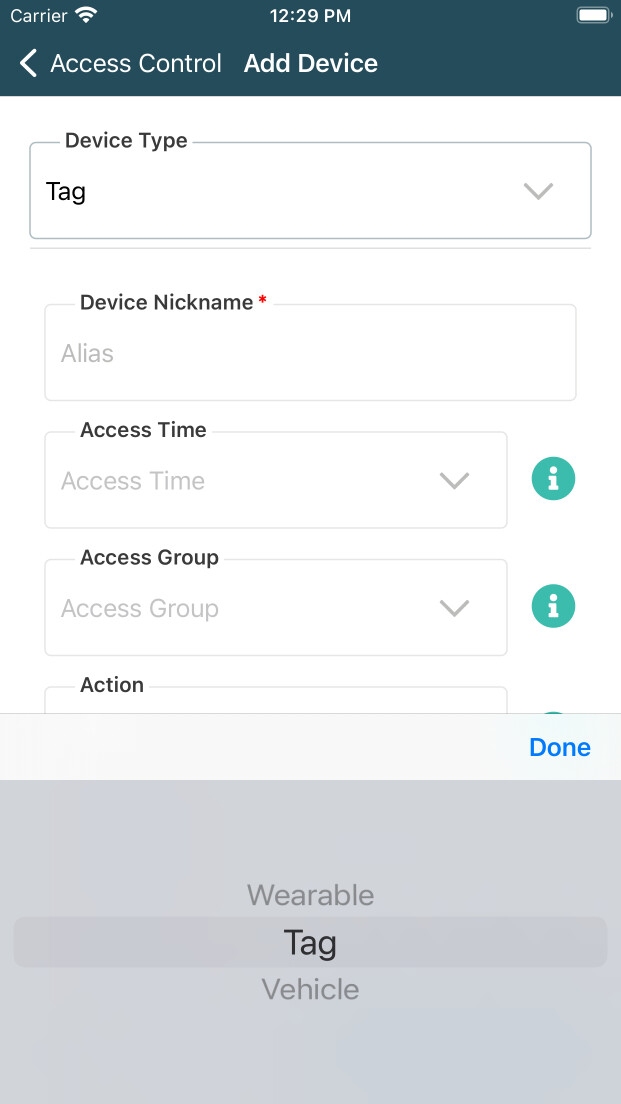
To enroll a Tag, select Access Control and tap the plus sign. Select Tag from the device type.
Enter a name for the Tag. This could be the name of the person using the tag, for example, one of your employees.
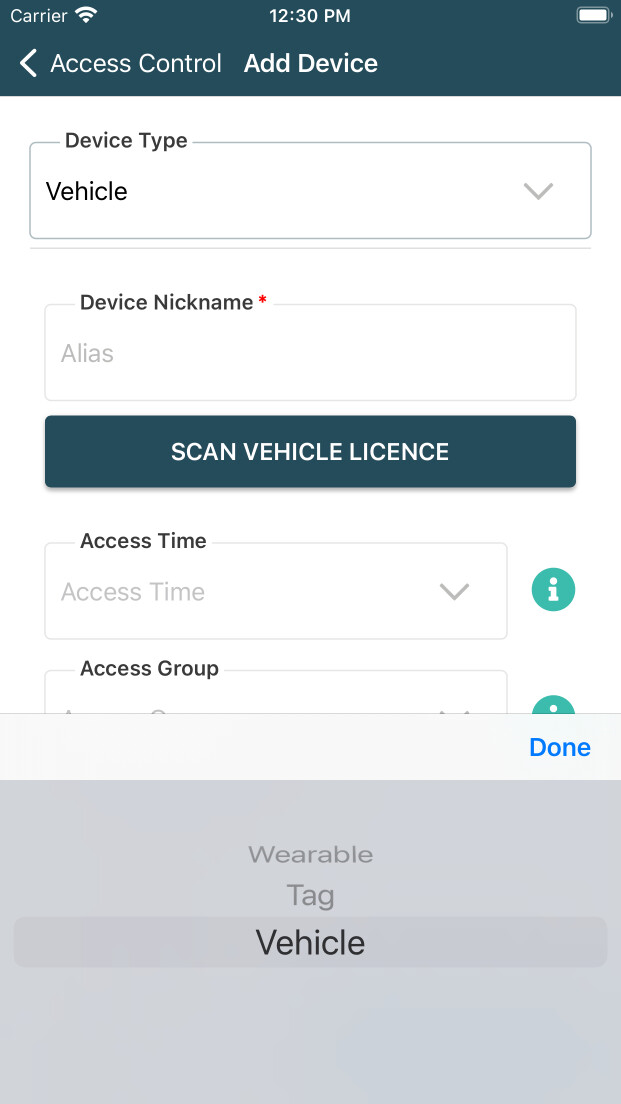
Enrolling Vehicles
This can only be performed by a Primary user.
Some estates may wish residents to capture their vehicle details. In addition, if the estate has installed a license plate recognition camera, it may become a means of access into the estate. When a vehicle approaches the entrance, the LPR camera will check if the registration is known and will allow entry.
Data Management and Security
This section deals with app security and how a user can go about managing their personal information
Security Features
For your protection, the OneSpace App incorporates several security features:
- Making sure it is you – To prevent unauthorized people from using your phone to gain access to the estate, the OneSpace App will ask you to use your phone’s default security mechanism to identify yourself at least once a day. This may be via gesture swipe, fingerprint, or face scan; or by traditional authentication such as passwords, PINs or patterns.
- Lost Phone – If you lose your phone, then you should inform the Site Administrator of your estate as soon as possible. They can then disable the phone, and it will not activate gateways thereafter. The biometric feature described above should normally take care of lost or stolen phones, but it may take 24 hours before the app requests identification again.
- Verify your Phone – Your estate management will institute policies that each Access Device must be verified every 60 (sixty) days of nonuse. This is to make sure that lost devices or devices belonging to residents who have moved out of the estate are disabled. After 60 days, and if an access device has not been used, the OneSpace system will send a notification that requests you to verify your Access Device. You will then have 7 days in which to do so. If you do not verify your device, it will be disabled. The verification procedure is as follows: Go to the Access Devices menu, select the device and from the Actions menu, select Verify. You now must use the device to activate a gateway before the end of the day. If you do not, then the device will be disabled. Once this process is complete, you will not have to verify again for 60 days.
- Disabled Access Device – If your Access Device becomes disabled, then you will have to request it to be re-enabled. To do this, select the device under Access Devices and then tap on the Re-Enable menu item. This will result in a message being sent to the Site Administrator. Once the device has been enabled, you will receive a notification.
Replacing your Phone
Everyone gets a new phone at some point. To preserve all your enrolments and Access Devices, you can use the Replace Phone feature.
To do this, follow the normal enrolment process as described in 'Enroll Your App' above. However, after you have selected the estate and unit, the app will detect that there are already phones enrolled for the unit.
You will be given a choice of enrolling an additional device or replacing an existing device. Choose Replace. Your details will automatically be pulled from the previous device. To ensure its you, you will need to verify either your email or phone through a One-Time PIN (OTP). Once authorized, all the existing entries will have been moved to the new phone and the old phone will have been deleted.
Keeping your Details up to Date
The OneSpace user self-management methodology allows the estate management team to keep a reasonably accurate database of residents and Access Devices. However, it requires you to update your information if there are any changes.
To update your details, select Account, tap Enrolments, select an Enrolment and then select Update from the action menu at the bottom. You can now update your details.
The updated details will be sent to Site Administrator and you will be notified when the changes have been captured.
Managing Access Devices
At any time, you can make changes to your enrolled Access Devices. There are two categories of changes, cosmetic and those that require authorization. Changing the name of a device does not require authentication, however if you make any changes to the access rules such as Access Group or Holder Class, this will require authorization.
Once these changes have been requested and they have been authorized, you will receive a notification.
If an Access Device is no longer in use, then you should delete it. This is done by selecting the Access Device and then tapping delete on the Action menu.
Visitor Management
The OneSpace system includes a comprehensive Visitor Management System (VMS).
The VMS allows residents to invite visitors and pre-authorize them before they arrive at the estate entrance. A pre-authorized visitor will experience smooth access to the estate. A visitor that arrives unannounced will have to go through a screening process before being allowed access, thereby delaying the process.
The VMS flow is based on a rules engine that has been preconfigured by estate management. The rules engine is largely driven by the risk that a potential visitor poses. For instance, a member of a resident’s family poses less risk than a plumber coming to fix a leaking pipe.
Risk Level
To define risk, a set of visitor categories have been created. The category is selected when a visit is created. The VMS flow is as follows:
- A resident invites a user, having selected a 'Visitor Type'.
- The rules engine decides what to do next based on the risk of the visitor type. If it is a very low risk category, then the visit is created and then flow goes to 7.
- If the risk is greater than a certain level, then the VMS will send an SMS to the visitor’s phone requesting them to input their details. The visitor will receive a message “XXX is expecting your visit. Please click the URL to enter your details.
- When the visitor taps the link, he or she will be taken to a form where they must fill in their details. Depending on the risk category, the amount of information requested may vary. If a visitor has been to the estate before, the OneSpace VMS will cache the visitor information. In such a case, the visitor information will be prepopulated in the form so that they do not have to reenter the information. Again, depending on the risk category, the visitor may also have to enter their vehicle information. This is also cached, so that the visitor may select the vehicle if they have visited in that vehicle previously.
- Once the visitor has filled in their information your app will receive a notification. When you tap the notification, the app will open the attached message. That message will have a URL link in it. You need to tap that link. This will result in your phone browser opening a VMS page showing the details that the visitor has entered.
- If you are happy with the information, then you can authorize the visit. This means that the duty of responsibility has moved to you.
- The visitor will then receive an SMS that tells them that their visit has been authorized. The message will also include a PIN if the visitor can gain access to the estate by entering a PIN on the keypad at the entrance or providing the PIN to the staff at the entrance. In addition, the message may also contain the phone number of the VMS intercom. When the visitor arrives, they can gain entrance by calling this number. It is a free dropped call.
- When the visitor arrives, the resident will receive a notification on the app telling them that their visitor has arrived.
- Once the visitor leaves, they can use the same PIN or call the VMS intercom to allow the exit.
- Once a visit is complete, the PIN is deleted, and a dropped call will not work anymore. In addition, the resident will be informed that the visitor has left.
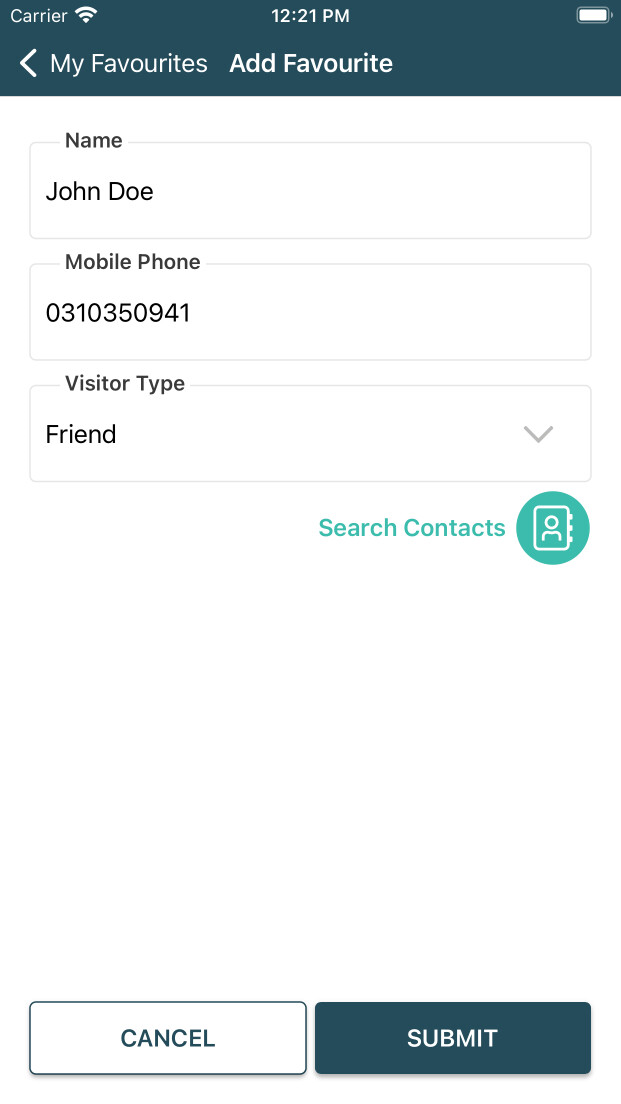
Creating your List of Frequent Visitors
To create a visitor, select Visitors from the menu and then tap the plus sign. You will be taken to a page where you can enter the visitor details and select a category. Alternatively, you can select the visitor from your contacts by tapping the contacts icon. Once a visitor has been added, it will appear in your list of frequent visitors.
Inviting a visitor
To invite one or more visitors, tap the Visitors menu item, select a visitor or visitors, and then tap the envelope icon. This will initiate the VMS process as outlined above.

Deleting Visitors and Cancelling Visits
To delete one or more visitors, tap the Visitors menu item, select a visitor or visitors, and then tap the X. Their entries will be deleted.
Once you have invited someone, you can view the visit and cancel it. You do this by going to the visitor’s menu page and then tapping the Visits icon at the bottom of the page. Select the visit and tap the delete action.